
These instructions apply to Ubuntu 10.04 Lucid Lynx LTS and VLC 1.0.6 Goldeneye.
Recording from a webcam on Linux has been very underwhelming for me. A program called Cheese comes with Ubuntu, but it has some shortcomings that really annoy me. First, I have to lower my 2MP webcam resolution to 320×240 in order to get non-crappy video. Second, it only records to Theora and Vorbis, which is nice in principal, but not for real usage.
After suffering with Cheese for a year or so, I was excited to learn that VLC – the awesome universal media player – can also record video now. VLC is readily available and you can easily install it through apt-get, synaptic, or the Ubuntu Software Center. I had only used VLC for playing videos, so I was really impressed by the scope of their recording and conversion features. These include methods for mass-converting video, adding in subtitles, ripping from DVD, and recording from the network or a DVR. I plan to look into how well these features work, as they could replace a lot of the conversion and prep that I normally do with FFMPEG. I am also able to record decent video at 640×480 resolution.
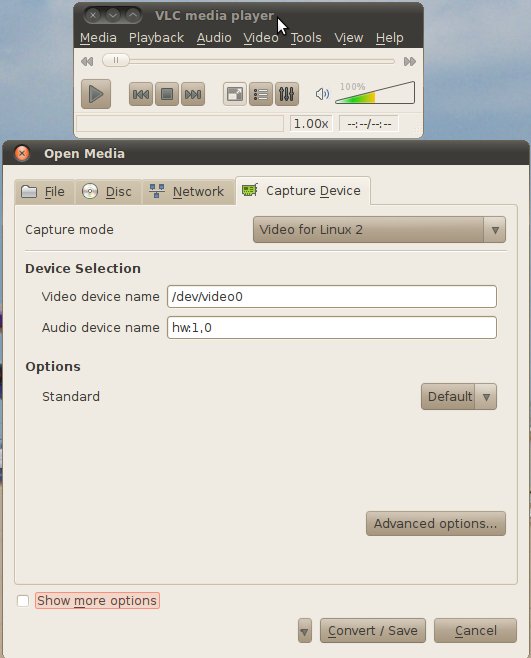
Once VLC installed and running, you can access the recording features through ‘Media -> Convert/Save’. For webcam recording we have to use the ‘Capture Device’ tab, and this is where it got tricky for me and my USB webcam. I had to use the following settings, which were not easy to find:
- Capture Mode: Video for Linux 2
- Video Device Name: /dev/video0
- Audio Device Name: hw:1,0
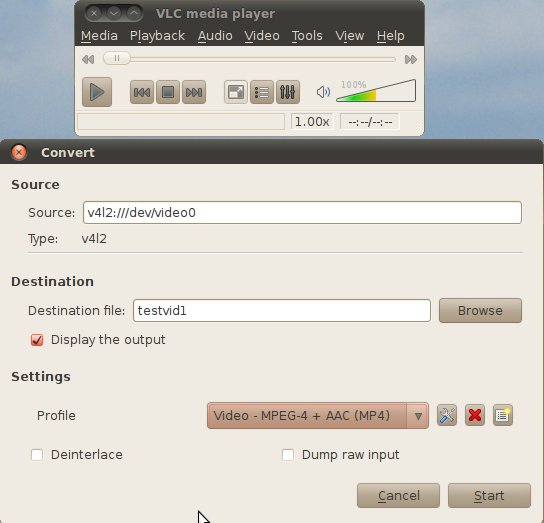
After clicking the ‘Convert/Save’ button, you can set the file to which you want to record and the codecs you want to use. I recommend using the ‘Video – MPEG-4 + AAC(MP4)’ as that will produce a file which works well with most Linux video editors. You also probably want to the check the ‘Display the output’ checkbox so you can see what you are recording as it is recorded.
The tricky parts are figuring out what to use in the Video Device Name and Audio Device Name fields, so I’ll go into that in more detail. It’s relatively easy to figure out the video device name your USB camera. Before you plug it in, do ‘ls /dev/video*’ on the command line, and then do it again afterwards. The video device that wasn’t in the first list but is in the second is most likely your webcam.
The really tricky part is the Audio Device Name. You can try to discover your microphone’s device name using the same method as for the video, ‘ls /dev/audio*’ or ‘ls /dev/mixer*’ or ‘ls /dev/dsp*’. All of the help I found on the web says you can use the audio device in that field, but it refused to work for me. Neither the mixer nor the dsp devices worked either. It would error out saying that the there was no alsa provider or that the device was not found, and no audio would be recorded. To make it work, I ended up having to find out the hardware designation that alsa gave my USB webcam microphone.
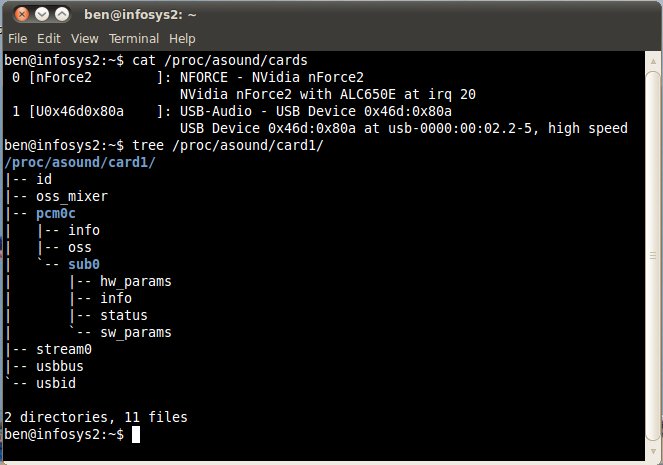
The first step is to figure out which device number alsa gave your webcam. This command will list all of your sound cards: ‘cat /proc/asound/cards’. You will probably have device number 0 as your regular sound card and device 1 as an USB-Audio device. The next step is to find out which subdevice on your webcam is the microphone. This command will show you a bunch of information about device 1: ‘tree /proc/asound/card1’. The subdevice number is under the ‘pcm0c’ or similar section. In my case, my webcam is device 1 and the microphone is subdevice 0. Using these, I can build the correct Audio Device Name for VLC recording.
One other problem you may encounter is that the recording volume on your microphone is really low or even muted. I was able to change my volume using this method:
- Click the volume control widgit in the top Gnome panel
- Select Sound Preferences
- Select the Input tab
- Select the USB webcam device
- Increase the volume to ~100%
- Close Sound Preferences
- Try a recording
- Adjust the volume as above until the sound is a good level
If this doesn’t work for you, you may be able to adjust it using the following method:
- Run the command ‘alsamixer’ in a terminal
- Press F4 to view the Capture settings
- Press F6 to select your USB microphone
- Use your left and right arrows to select the Mic bar
- Use your up and down arrows to adjust the volume
- Press Esc to exit
- Test the sound in a recording
- Rinse and repeat until the sound level is comfortable
Here’s a little fodder for the indexers:
vlc audio problem linux
VLC is unable to open the MRL ‘alsa:///dev/audio1’. Check the log for details.
main access error: no access module matched “alsa”
access_alsa demux error: cannot open device /dev/audio1 for ALSA audio (No such file or directory)
main input error: open of `alsa:///dev/audio1′ failed: no access module matched “alsa”

